How would you make this? Will this work?

Collapse
This topic is closed.
X
X
 
  • Time
  • Show
Clear All
new posts
  • atgcpaul
    Veteran Member
    • Aug 2003
    • 4055
    • Maryland
    • Grizzly 1023SLX

    How would you make this? Will this work?

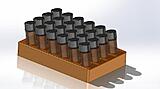
    I need to make a fixture for a machine at work--imagine a router bit holder--that can hold 49 evenly spaced vials (bits). 7 rows and 7 columns. However, the challenge is I need each vial to sit in the fixture at a 10deg angle from vertical and I need the bottom to be at a consistent height.

    I had to make a smaller fixture for 24 vials (4x6) and I had our machinist design it in Solidworks and I 3D printed it. Well, the 3D printer broke soon afterwards so I need to go old school.


    Here are the facts:

    1) The center to center spacing of the vials is 2cm.
    2) I want the final fixture to be about 15cm x 15cm (~6"x~6") square
    3) It should be at least 2cm tall.

    Here's what I was thinking:

    1) Cut a 3/4" thick board to 6"x6" and lay out a 7x7 grid with a mark at every 2cm.
    2) Rip 6 strips to exactly 2cm wide.
    3) Tilt the drill press table to 10deg to the left from vertical
    4) Line up my forstner bit on the right most column of marks and clamp a fence on the drill press table to the left side of the block.
    5) Set the depth to as deep as possible without blowing through the bottom.
    6) Drill the first seven holes in column 7.
    7) Add one of the 2cm strips between the fence and block.
    8) Drill the second seven holes in column 6.
    9) Repeat steps 7 and 8 until all the holes are drilled.

    Other than getting the 3D printer fixed (which isn't going to happen fast enough), is this a good way to do it? Is there a better way?

    Thanks,
    Paul
  • LCHIEN
    Internet Fact Checker
    • Dec 2002
    • 20969
    • Katy, TX, USA.
    • BT3000 vintage 1999

    #2
    you didn't say how you were going to locate the row to drill.
    If you run the grid marks all the way to the left side, then if you mark a single line on your fencewith the center of the drill - or even the edge of the drill if you want- , you can line this up each time you move to a new row (which will be 49 times - 7 rows on each of seven columns). A fine pencil mark will be easy to line up and very fast and actually quite accurate.

    If you have a large bevel countersink bit you could quickly bevel each hole for a polished look and easier insertion.

    It should be quite accurate making the matrix and look quite good as a drill press with fence is qutie accurate
    Last edited by LCHIEN; 04-24-2015, 11:31 AM.
    Loring in Katy, TX USA
    If your only tool is a hammer, you tend to treat all problems as if they were nails.
    BT3 FAQ - https://www.sawdustzone.org/forum/di...sked-questions

    Comment

    • leehljp
      Just me
      • Dec 2002
      • 8439
      • Tunica, MS
      • BT3000/3100

      #3
      It was easy to visualize in the way you wrote it, and I think it would work. However, considering what you want in the professional setting, I would look for a machine shop, even a woodworking machine shop and let them CNC it. Probably cost $50 to $100 depending, but for a lab like you work in, it would be worth it.

      I have done a multiplicity of holes similarly before, and I got lucky as the layout looked quite professional. I also see how a simple home workshop CNC could do that in a couple of minutes without a hitch. You are not building on a home project; See if you can find a CNC woodworker. Then you might see the need for a new home tool!
      Hank Lee

      Experience is what you get when you don't get what you wanted!

      Comment

      • Stytooner
        Roll Tide RIP Lee
        • Dec 2002
        • 4301
        • Robertsdale, AL, USA.
        • BT3100

        #4
        What I would do is machine holes in an aluminum flat bar. Multiple holes along the edge of the bar. Identical depth. Make several of these bars. Then drill and tap each end. Then mount those in a frame or two runners. Then you can adjust the degree of tilt on all the bars. Lock the screws down at that point. It could easily be designed to be expandable this way too. Throw it in the dishwasher when dirty.
        The same can be done in wood , or plastic of course, but I don't machine wood in my mills.
        Lee

        Comment

        • JR
          The Full Monte
          • Feb 2004
          • 5633
          • Eugene, OR
          • BT3000

          #5
          How about making a little fence for the drill press. That will keep the piece from moving. Mark your 2cm spaces on the fence and move the piece along as you drill.
          JR

          Comment

          • PartTimeHack
            Forum Newbie
            • Mar 2015
            • 41
            • TN
            • Ryobi BT3000

            #6
            Are the vials tapered or have a stop on which they can rest other than the bottom? In other words, can the holes be all the way through the part?

            Depending on your choice of material, you could get them cut with a laser or water jet.

            There are several places you can send in your model and have it 3D printed for you.

            Otherwise, it is a pretty simple CNC setup for a local shop.

            Of course, doing it yourself may just be satisfying.

            Comment

            • vaking
              Veteran Member
              • Apr 2005
              • 1428
              • Montclair, NJ, USA.
              • Ryobi BT3100-1

              #7
              Does it have to be made of single piece of wood from the beginning? If you want your contraption to be 2" thick with 1.5" deep holes - can you initially make 1.5" thick slab, drill holes all the way through, then glue up 0.5" thick bottom.
              Alex V

              Comment

              • atgcpaul
                Veteran Member
                • Aug 2003
                • 4055
                • Maryland
                • Grizzly 1023SLX

                #8
                Originally posted by JR
                How about making a little fence for the drill press. That will keep the piece from moving. Mark your 2cm spaces on the fence and move the piece along as you drill.
                Good idea.

                Originally posted by PartTimeHack
                Are the vials tapered or have a stop on which they can rest other than the bottom? In other words, can the holes be all the way through the part?
                The vials are straight sided so the fixture needs a bottom.


                Originally posted by vaking
                Does it have to be made of single piece of wood from the beginning? If you want your contraption to be 2" thick with 1.5" deep holes - can you initially make 1.5" thick slab, drill holes all the way through, then glue up 0.5" thick bottom.
                The majority of the dimensions were in centimeters, not inches, so my part will be less than 3/4" thick, but 3/4" is fine, too.

                This is one of those "wouldn't it be nice if..." projects and so I'm not concerned that it won't be up to snuff for work. I also need to get started using it (or not) by next week and I don't think I can find a CNC shop, etc, by then. I also just want to try it myself.

                I'm curious, though. Many of you suggested finding a place to CNC this, but I don't see how that's possible with a traditional XYZ mill--unless you tip the piece 10 degrees up and then teach the bit to start drilling at a different Z height for each column. You'd need a multiaxis CNC which higher end places might have, but I doubt a hobbiest would.

                I'm "teleworking" the rest of the afternoon--getting work advice on BT3 counts, right?--so I think I know what I'm going to do for the next couple of hours.

                Paul

                Comment

                • atgcpaul
                  Veteran Member
                  • Aug 2003
                  • 4055
                  • Maryland
                  • Grizzly 1023SLX

                  #9
                  Originally posted by Stytooner
                  What I would do is machine holes in an aluminum flat bar. Multiple holes along the edge of the bar. Identical depth. Make several of these bars. Then drill and tap each end. Then mount those in a frame or two runners. Then you can adjust the degree of tilt on all the bars
                  Guess which way won out? I cut my 6" square blocks, ripped my 2cm strips and laid out my grid. Then I thought, Does my DP have enough swing? Nope. I've got 4", but need almost 6"--that sounds wrong.


                  Anyway, I didn't want to do half and flip the table the other direction, so I'm going Lee's route.

                  This is "boring".

                  Comment

                  • PartTimeHack
                    Forum Newbie
                    • Mar 2015
                    • 41
                    • TN
                    • Ryobi BT3000

                    #10
                    Stupid question(s) here.

                    If you need a constant hole depth, and a constant angle, could you not just
                    machine the holes perpendicular to the plate surface, then

                    1) machine the 10 degree angle from the bottom of the plate

                    or

                    2) Add rest buttons, or "legs" if you will to one side of the plate causing the angle?

                    Granted, for #1, you'd have to start out with more like a 1 1/2" (38-40 mm) plate instead of 3/4".

                    Or, I suppose you could keep the main plate flat, and add on side "wings" if you will that have bottoms cut on a 10 degree angle.
                    Attached Files
                    Last edited by PartTimeHack; 04-24-2015, 03:33 PM.

                    Comment

                    • atgcpaul
                      Veteran Member
                      • Aug 2003
                      • 4055
                      • Maryland
                      • Grizzly 1023SLX

                      #11
                      Originally posted by PartTimeHack
                      Stupid question(s) here.

                      If you need a constant hole depth, and a constant angle, could you not just
                      machine the holes perpendicular to the plate surface, then
                      No. The machine that will use this rack is expecting the tops of the vials to all be at the same height (or it's going to crash into the vials).

                      I finished gluing up the rack about 1/2hr ago. I'm going to glue on a base and then attach an adapter plate that has the same footprint as that red rack. This will allow it to sit snugly on the machine's deck. At least I can try this out as a proof of concept. In the mean time, I need to get that 3D printer fixed.

                      Thanks for everyone's input.


                      In case you're curious why I want the vials tipped...it's because the vials are flat bottomed. This makes it difficult to extract every last drop of liquid from it (think about how you drink from a soda cup with a straw). The tip that will extract the liquid can now go down to the very bottom corner of the vial bottom

                      Comment

                      • PartTimeHack
                        Forum Newbie
                        • Mar 2015
                        • 41
                        • TN
                        • Ryobi BT3000

                        #12
                        Which liquid handler are you using? Just curious.

                        Comment

                        • atgcpaul
                          Veteran Member
                          • Aug 2003
                          • 4055
                          • Maryland
                          • Grizzly 1023SLX

                          #13
                          Originally posted by PartTimeHack
                          Which liquid handler are you using? Just curious.
                          This rack will be used on a Tecan Freedom EVO 100.

                          I also have 2 Perkin Elmer EP3s, 1 expanded deck PE JANUS with the MDT head and Varispan arm, 1 small PE Janus with just the MDT head, and in a couple of weeks, I will take delivery of 2 new Biomek FXps with fixed heads and 8-channel Varispan. All of them except the Tecan have stackers.

                          Do you do any liquid handling? Ialways like talking shop.

                          It's after 5 here and I'm about to do some liquid handling, but it's going to be the kind that goes in a glass with some ice.

                          PS--Forgot to mention. I also have an EDC ATS-100 acoustic dispenser. It uses sound waves to move liquids from one plate to another plate through the air--no contact.
                          Last edited by atgcpaul; 04-24-2015, 04:55 PM.

                          Comment

                          • PartTimeHack
                            Forum Newbie
                            • Mar 2015
                            • 41
                            • TN
                            • Ryobi BT3000

                            #14
                            I have had the need in the past to use liquid handlers in the design of an semi-automated laboratory systems.

                            I am familiar with Tecan, Hamilton, TTP Labtech, Matrix, Agilent, etc....

                            I can speak some shop with you, but I am an Engineer not a Scientist.

                            Comment

                            • capncarl
                              Veteran Member
                              • Jan 2007
                              • 3569
                              • Leesburg Georgia USA
                              • SawStop CTS

                              #15
                              Now that you have it figured out, my suggestion would to be pick up a cross slide machinist vice for your drill press from Harbor Freight. To create the angle desired you would cut wedge shape the right angle with planer jig, and bolt he the vice on the drill press on this wedge. This is a neat addition for a drill press and usually cost less than $50. You can easily cut all kinds of slots in wood using a router bit and not have to diddle around with a router. This turns your drill press into a milling machine.
                              capncarl
                              Attached Files

                              Comment

                              Working...