Simple box joint jig for the Ryobi BT3x00 related saws, and my first box joints.

Collapse
This topic is closed.
X
X
 
  • Time
  • Show
Clear All
new posts
  • dbhost
    Slow and steady
    • Apr 2008
    • 9215
    • League City, Texas
    • Ryobi BT3100

    Simple box joint jig for the Ryobi BT3x00 related saws, and my first box joints.

    My latest project, and blog entry at http://daves-workshop.blogspot.com/2...bi-bt3100.html is all about the BT3x00, more or less. I created a very simple yet shockingly effective box joint jig for use with the saw.

    My first box joints using this jig, are surpisingly clean, snug fitting, and accuate. And yes I intentionally left the tails proud of the surface...


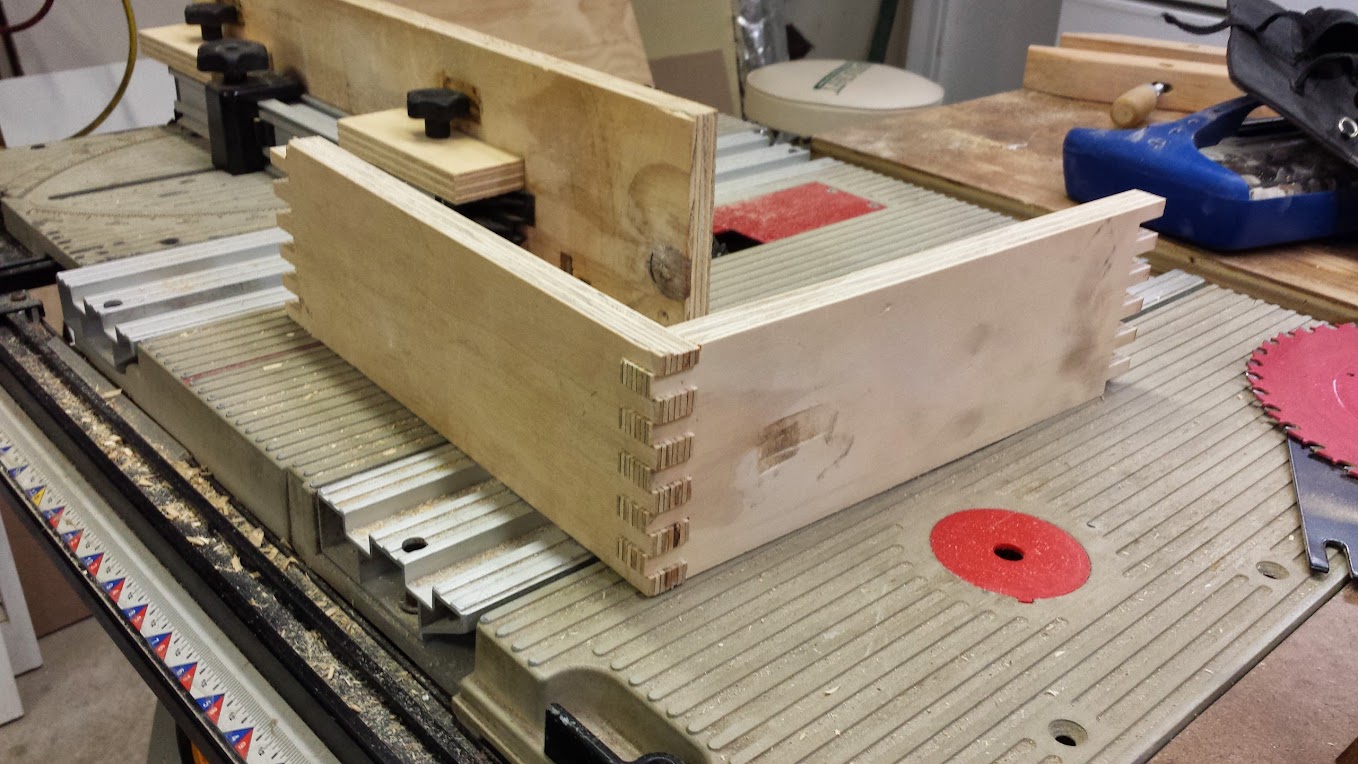
    I had to remove material to clear the star knob on the back side of the 3/4 stock, this was done with a regular grinding stone on a dremel. Not super pretty, but I have plenty of clearance now!


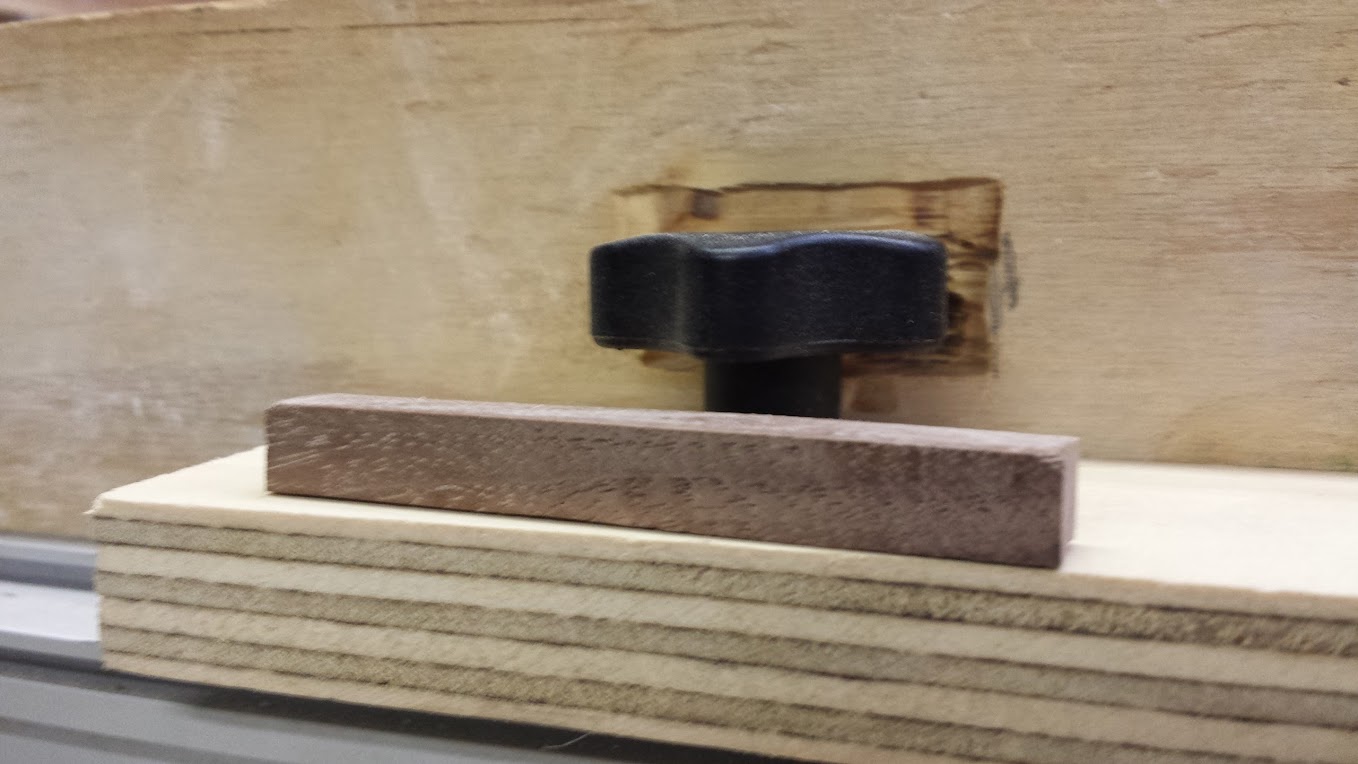
    The indexing pin is a 3/8" walnut scrap that I attached with a finish nail with my air nailer, and Titebond III. The spacing in to set my first cut / align the jig to the dado stack is just the cutoff of that same piece. Very effective, very affordable to do!


    I have a LOT of projects I need to work, and I feel this setup should allow me to produce some drool worthy joints.

    I need to grab some cheap stock to practice with, and set up the dovetail jig, both the MLCS and Harbor Freight jigs, and my box joint jigs, and just build boxes. Mostly to build skill more than boxes.

    Once I am more comfortable with making these joints, I need to get very, very busy building things, to start off with, drawers, and a lot of them. I am going to reface my cabinets through the house, and in the process also replace the lousy butt joint and brad nail drawer boxes the builder used... I already have the bits I want to use for the doors which is the MLCS #8782 mitered door frame bit, and I have the matching cove bit. It's a squeeze, but I have fabbed up a sample drawer front using this bit set out of pine. Looked great. (Should have taken photos of it, but didn't think about it sorry...).

    My first priority though should be a shadow / display box for LOML's wedding "stuff" (bouquet, garter, veil etc...).
    Please like and subscribe to my YouTube channel. Please check out and subscribe to my Workshop Blog.
  • tfischer
    Veteran Member
    • Jul 2003
    • 2343
    • Plymouth (Minneapolis), MN, USA.
    • BT3100

    #2
    Nice. I've been wanting to build a box joint jig so I'll have to take a deeper look.

    Comment

    • Black wallnut
      cycling to health
      • Jan 2003
      • 4715
      • Ellensburg, Wa, USA.
      • BT3k 1999

      #3
      Dave your jig is a testament to both your ability to correctly adjust the SMT and the ability of the SMT to be a precision device. Nicely done!
      Donate to my Tour de Cure


      marK in WA and Ryobi Fanatic Association State President ©

      Head servant of the forum

      ©

      Comment

      • JR
        The Full Monte
        • Feb 2004
        • 5633
        • Eugene, OR
        • BT3000

        #4
        Nice!

        Originally posted by dbhost
        Once I am more comfortable with making these joints, I need to get very, very busy building things, to start off with, drawers, and a lot of them.
        IMHO that's the key to doing box joints. The setup can be pretty finicky - at least it is for me. So once you've got it ready it's best to do a lot of them.

        You'll want to make sure the width of the stock is close to a multiple of the dado width.
        JR

        Comment

        • capncarl
          Veteran Member
          • Jan 2007
          • 3568
          • Leesburg Georgia USA
          • SawStop CTS

          #5
          I like your jig. building it on the slider makes it glide well. The registration pin keeps everything "right". I tried a simular version of yours with good luck. My findings were that it was difficult to keep the stock vertical and move it every cut. To solve the problem of figuring out lefts and rights or whatever you want to call the adjoining finger piece I allow about 1 inch extra width on all boards. This amounts to drawer sides about 1 inch too tall, so I stack and square 4 boards and screw the stack together in this extra area. After all are finger cut at one time the screws are removed and the tops and bottoms are sliced off.

          Comment

          • dbhost
            Slow and steady
            • Apr 2008
            • 9215
            • League City, Texas
            • Ryobi BT3100

            #6
            Mind you, there was some "shimming" I had to do to the dado throat plate to get it to fit flush, it sits recessed enough to cause a problem if just attached directly. however... once shimmed (painters tape, I know, hokey but it works), I just us the throat plate to reference my stock before the cut. Seems to keep it square...

            The ribbed top of the saw I found to be problematic with cutting the 3/8" fingers on my first attempts as they would tend to find their way into the grooves in the top, and cause all sorts of alignment / depth of cut issues.

            There are not a lot of areas where I will outright complain about the BT3x00, but the ribbed table is one of them, that is something I wish no table saw MFG would do... I understand the why, allowing wood to slide easier over lighter / cheaper materials such as aluminum instead of expensive / heavier cast iron, I just just wish they had used a better solution.
            Please like and subscribe to my YouTube channel. Please check out and subscribe to my Workshop Blog.

            Comment

            • LCHIEN
              Internet Fact Checker
              • Dec 2002
              • 20966
              • Katy, TX, USA.
              • BT3000 vintage 1999

              #7
              Originally posted by dbhost
              ...

              The ribbed top of the saw I found to be problematic with cutting the 3/8" fingers on my first attempts as they would tend to find their way into the grooves in the top, and cause all sorts of alignment / depth of cut issues.

              There are not a lot of areas where I will outright complain about the BT3x00, but the ribbed table is one of them, that is something I wish no table saw MFG would do... I understand the why, allowing wood to slide easier over lighter / cheaper materials such as aluminum instead of expensive / heavier cast iron, I just just wish they had used a better solution.
              One way around this is to put a "shelf" on the bottom of your fence.
              This way the index pin and the workpieces all sit on a flat, straight bottom that you supplied. The blade will have to be raised to add the thickness of the shelf to the blade height. The shelf will be cut by the blade; You might want to make the shelf 6 or 8 inches deep so your blade does not cut all the way across the shelf giving it some additional stiffness, OR, put another rail across the back of the shelf. Either way your work now sits on a flush bottom (no ribs), no throat plate depression (if you haven't shimmed your throat plate (which I recommend you do using layers of tape as Dave did).

              If, as some BT3s are, your SMT is not exactly the same height as the main saw table, you will want to shim the low side so that the part across the main table is perfectly flat across the main table. Usually, if anything the SMT is a few thousands higher than the main table.

              That's how I made my box joint jig.
              Last edited by LCHIEN; 04-16-2014, 08:59 AM.
              Loring in Katy, TX USA
              If your only tool is a hammer, you tend to treat all problems as if they were nails.
              BT3 FAQ - https://www.sawdustzone.org/forum/di...sked-questions

              Comment

              • dbhost
                Slow and steady
                • Apr 2008
                • 9215
                • League City, Texas
                • Ryobi BT3100

                #8
                Actually, not sure if it shows up well in the photo, but the SMT on my saw sits flush to the table, neither high, nor low... The SMT on my original BTS21 sat high and ticked me off to no end...

                Indexing off of the throat plate seems to work for me, but yes, the idea of a shelf has occoured to me as well...
                Please like and subscribe to my YouTube channel. Please check out and subscribe to my Workshop Blog.

                Comment

                Working...