
 Tweet
Tweet
My Dad babysat our youngest last week while her daycare was closed. One morning when he came to pick her up, he asked me if I could cut a new circular top for their outdoor patio table. He handed me some scrappy plywood and the subbase. Just cut me a circle and I'll screw it on to the base, he said.
He obviously doesn't know me too well.
I've been saving these white oak boards I got for real cheap (if you don't count the broken windshield) for years. I had plans to make an Adirondack chair. Well, I could spare two boards for dear old Dad's table.
Planed them down to even thickness. Doesn't matter how thick, just even and no more rough surface.
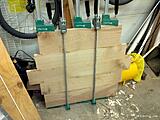
Glued them together to make a 30" top using Titebond 3.
Sanded them smooth using a belt sander then a ROS and cut it roughly to 30" with my jigsaw.
I couldn't find my double stick tape so I clamped my plunge router to the makeshift trammel and plunged a hole. I measured 15" from the edge of the hole to another point on the trammel and drove a roofing nail through it. I aligned the nail point to the center mark on the top and gave a few more whacks of the hammer to secure it. Then I just started routing in successively deeper passes until I had my perfect circle.

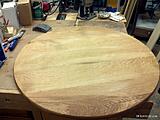
I then routed a slight round over on the top and bottom edges and just hit it with some sandpaper to just smooth the edges a tad. Here it is with some mineral spirits wiped on
And with the subbase. There's a 1/2" gap between the frame and top so I'll shim it with some 1/2" stock, drill some oversized holes in the frame and attach the top with some screws. I may peel off that faux blue wicker. I'm going to leave it to my Dad to apply the finish. Milling the rough lumber took the longest, followed by sanding at around 2 hours but everything else was cake. I love quickies.

Thanks for looking
Paul
He obviously doesn't know me too well.
I've been saving these white oak boards I got for real cheap (if you don't count the broken windshield) for years. I had plans to make an Adirondack chair. Well, I could spare two boards for dear old Dad's table.
Planed them down to even thickness. Doesn't matter how thick, just even and no more rough surface.
Glued them together to make a 30" top using Titebond 3.
Sanded them smooth using a belt sander then a ROS and cut it roughly to 30" with my jigsaw.
I couldn't find my double stick tape so I clamped my plunge router to the makeshift trammel and plunged a hole. I measured 15" from the edge of the hole to another point on the trammel and drove a roofing nail through it. I aligned the nail point to the center mark on the top and gave a few more whacks of the hammer to secure it. Then I just started routing in successively deeper passes until I had my perfect circle.
I then routed a slight round over on the top and bottom edges and just hit it with some sandpaper to just smooth the edges a tad. Here it is with some mineral spirits wiped on
And with the subbase. There's a 1/2" gap between the frame and top so I'll shim it with some 1/2" stock, drill some oversized holes in the frame and attach the top with some screws. I may peel off that faux blue wicker. I'm going to leave it to my Dad to apply the finish. Milling the rough lumber took the longest, followed by sanding at around 2 hours but everything else was cake. I love quickies.
Thanks for looking
Paul
 Loring in Katy, TX USA
Comment