BT3 Mobile Base: Phase 1 Complete

Collapse
This topic is closed.
X
X
 
  • Time
  • Show
Clear All
new posts
  • Tom Miller
    Veteran Member
    • Mar 2003
    • 2507
    • Twin Cities, MN
    • BT3000 - Cuttin' it old school

    BT3 Mobile Base: Phase 1 Complete

    ...well, as complete as it's gonna get, anyway. Someday (i.e. never) I'll add drawer fronts and trim.

    Click image for larger version

Name:	Mobile Base.jpg
Views:	1
Size:	42.8 KB
ID:	788564


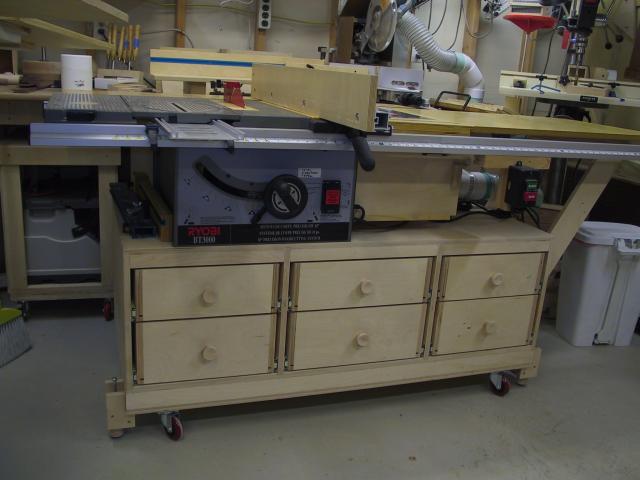
    I made the base 4.5' wide, and plan to make the last ~1.5' - 2' of the table detachable; hence, the cantilevered support on the right. This will make the base even more mobile in my shop.

    Phase 2, BTW, will be a new compartment for the router (including a new table), with drawers to the right which will extend to the end of the base on the right.

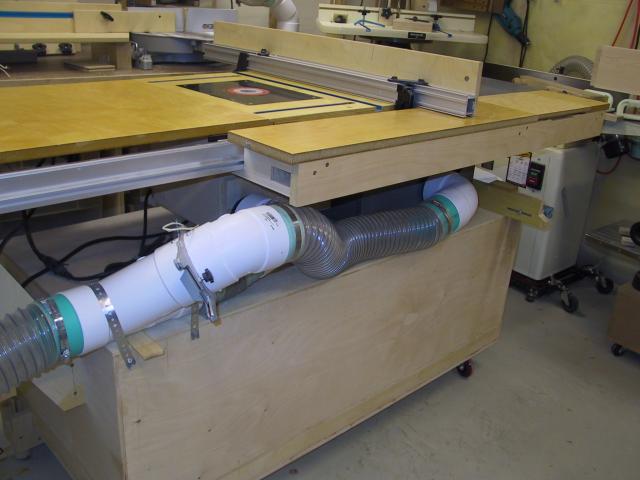
    Another big improvement is getting the saw and router table DC mounted solidly. There's enough play in the hose to the saw so I can change bevel angle. Blast gates for the saw (visible) and router (not visible), are easy enough to reach over the saw table.


    Click image for larger version

Name:	Mobile Base DC.jpg
Views:	1
Size:	42.7 KB
ID:	788566


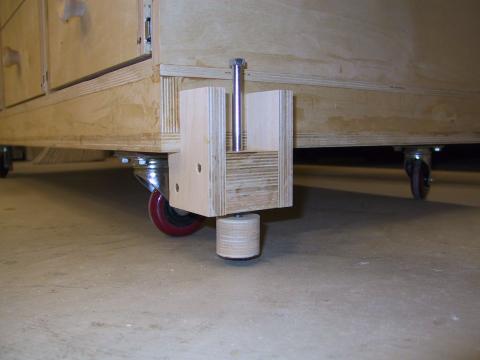
    I had installed double locking swivel casters in front, but in the end I wanted this to be rock solid. So, I made and installed these levelers (one on each side) which really does the trick:

    Click image for larger version

Name:	Leveler Foot.jpg
Views:	3
Size:	21.7 KB
ID:	788565


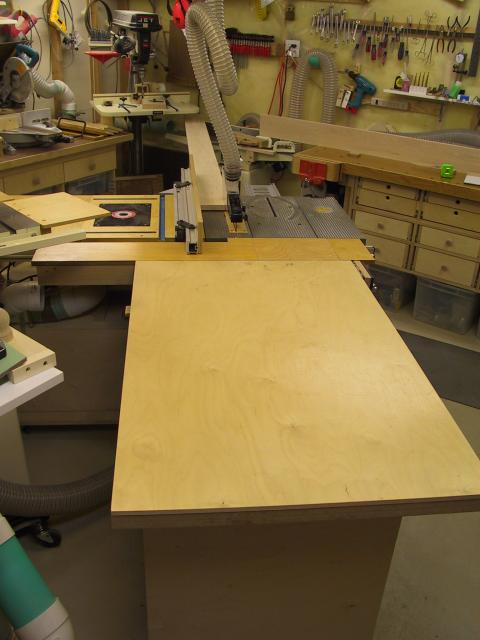
    Now that I'm much more mobile, it's easy to move the saw and outfeed table around to make room for this 8' long rip in my 13' x 15' shop.

    Click image for larger version

Name:	Long Rip Outfeed.jpg
Views:	1
Size:	43.7 KB
ID:	788567


    Regards,
    Tom
  • Bud
    Forum Newbie
    • Feb 2006
    • 30

    #2
    That looks very user friendly

    Bud

    Comment

    • sacherjj
      Not Your Average Joe
      • Dec 2005
      • 813
      • Indianapolis, IN, USA.
      • BT3100-1

      #3
      For the levelers, I assume you just sandwitched a t-nut between the plywood and use a rachet to lower the foot, once in place?
      Joe Sacher

      Comment

      • Tom Miller
        Veteran Member
        • Mar 2003
        • 2507
        • Twin Cities, MN
        • BT3000 - Cuttin' it old school

        #4
        Originally posted by sacherjj
        For the levelers, I assume you just sandwitched a t-nut between the plywood and use a rachet to lower the foot, once in place?
        Actually, the t-nut is on the bottom of the 3-layer piece. I made it 3 layers with a fairly snug hole so there would be little side-to-side slop. Still, it's smooth enough operation that I can raise and lower by hand, until the foot contacts the floor. Then I give it a couple half-turns with a wrench to make it solid.

        Regards,
        Tom

        Comment

        • gad5264
          Veteran Member
          • Aug 2005
          • 1407
          • Columbus, Ohio, USA
          • BT3000/BT3100NIB

          #5
          Tom,
          Would it be possible for you to post a few detailed pics of the cabinet you have around the router base?
          Grant
          "GO Buckeyes"

          My projects: http://community.webshots.com/user/gad5264

          Comment

          • monte
            Forum Windbag
            • Dec 2002
            • 5242
            • Paw Paw, MI, USA.
            • GI 50-185M

            #6
            Looks good Tom. Nice idea.
            Monte (another darksider)
            Reporting Live from somewhere near Kalamazoo

            http://community.webshots.com/user/monte49002

            Comment

            • Ken Massingale
              Veteran Member
              • Dec 2002
              • 3862
              • Liberty, SC, USA.
              • Ridgid TS3650

              #7
              That really is clever, Tom. Looks very well made and sturdy.
              ken

              Comment

              • Tom Miller
                Veteran Member
                • Mar 2003
                • 2507
                • Twin Cities, MN
                • BT3000 - Cuttin' it old school

                #8
                Thanks for the comments, guys!

                Originally posted by gad5264
                Tom,
                Would it be possible for you to post a few detailed pics of the cabinet you have around the router base?
                The current router compartment isn't much to show -- it's just a cobbled together enclosure that attaches (not very well) to the underside of the router table. There was a post recently showing a much better attachment scheme, if you're looking to hang a compartment underneath your table. I'll try to find the thread.

                My new router compartment is going to be a little more traditional in that it will sit on the mobile base, and support the table above it.

                Regards,
                Tom

                Comment

                • Brian G
                  Senior Member
                  • Jun 2003
                  • 993
                  • Bloomington, Minnesota.
                  • G0899

                  #9
                  It's shaping up nicely, Tom.

                  I've been meaning to ask. . . .which Twin Cities BORG is your haunt for the Sched 35 pipe you use? I've looked (perhaps in the wrong place) at Bloomington, Burnsville, Eden Prairie, Inver Grove Heights, and Edina. Thanks.
                  Brian

                  Comment

                  • Tom Miller
                    Veteran Member
                    • Mar 2003
                    • 2507
                    • Twin Cities, MN
                    • BT3000 - Cuttin' it old school

                    #10
                    Originally posted by Knuckles
                    It's shaping up nicely, Tom.

                    I've been meaning to ask. . . .which Twin Cities BORG is your haunt for the Sched 35 pipe you use? I've looked (perhaps in the wrong place) at Bloomington, Burnsville, Eden Prairie, Inver Grove Heights, and Edina. Thanks.
                    You're getting colder....colder....

                    I get it at the Woodbury HD (Radio Drive, just south of 94), and also at the Oakdale Menards (on 694 just a few miles north of 94 -- you can see it from the road). I can't say for sure if I've seen it recently at HD, but I'm sure Menards still has it.

                    Regards,
                    Tom

                    Comment

                    • lcm1947
                      Veteran Member
                      • Sep 2004
                      • 1490
                      • Austin, Texas
                      • BT 3100-1

                      #11
                      Man, you've got yourself one serious looking rig there! Very nice job. I know you are really proud of it - as you should be.
                      May you die and go to heaven before the Devil knows you're dead. My Best, Mac

                      Comment

                      • Brian G
                        Senior Member
                        • Jun 2003
                        • 993
                        • Bloomington, Minnesota.
                        • G0899

                        #12
                        Tom, I meant Eagan when I typed Edina. So, that means I was actually getting warmer because I was workin' my way to the east.

                        Thanks for the info.
                        Brian

                        Comment

                        • hobkirk
                          Forum Newbie
                          • Jul 2005
                          • 85
                          • Acton, MA, home of the original Minuteman - about 20 miles West of Boston

                          #13
                          Tom -

                          Excellent ideas.
                          • I love the back table extension, effectively adding several inches of depth to the table. It also increases the space for the DC plumbing.
                          • Your fence mods really add to the advantage of the back table extension.

                          Wow! I am building a dual BT3000 rig (the second saw was cheaper than a set of extension rails) and I am going to include some ideas from your creation.

                          Thank you!

                          PS I would really love to see more pictures - a top view, details on the back table extension, the fence, DC plumbing attachments, etc.
                          Doug Hobkirk
                          WOOD LOON

                          Comment

                          • AlanJ
                            Established Member
                            • Feb 2006
                            • 150
                            • Rochester, MN
                            • BT3100

                            #14
                            Tom,

                            If you're like me you can see all the things you'd do differently if you made another one. Of course ther'es no room in your shop for the new one...unless you found a home for your 'prototype'. Being just down the road from you I suppose I could find a home for it. I'd even pick it up!

                            Seriously - that looks great!
                            Alan

                            Comment

                            • Tom Miller
                              Veteran Member
                              • Mar 2003
                              • 2507
                              • Twin Cities, MN
                              • BT3000 - Cuttin' it old school

                              #15
                              Originally posted by hobkirk
                              ...I would really love to see more pictures - a top view, details on the back table extension, the fence, DC plumbing attachments, etc.
                              Sorry I dropped off for a few days....

                              Here's some detail on what I call, for lack of better term, the "intermediate outfeed table". The main purpose was to be a buffer for the SMT travel, so it wouldn't bump into my outfeed workbench/cabinet. Like you say, it also blocks off some space for DC. Sitting on the Outfeed Table proper is a little filler piece for the Intermediate Table where the SMT goes.


                              Click image for larger version

Name:	Intermediate Outfeed.jpg
Views:	2
Size:	42.6 KB
ID:	779129


                              Click image for larger version

Name:	Int Outfeed Underside.jpg
Views:	2
Size:	24.0 KB
ID:	779130


                              I've re-worked the attachment slightly since these photos, but it's still essentially the same.

                              Here's my Long-n-Tall fence. I bought the Ryobi accessory long rip extrusion, only because it was on clearance. But I really like having a long (3.5 ft) fence.

                              Click image for larger version

Name:	Long-n-Tall Fence.JPG
Views:	2
Size:	50.7 KB
ID:	779131

                              Alan, if I decide to roll this one to the curb I'll give you a call!

                              Regards,
                              Tom
                              Last edited by Tom Miller; 03-15-2006, 02:15 AM.

                              Comment

                              Working...