

 Tweet
Tweet
I thought that there might be some interest on this forum in my experience ordering for and installing the Grizzly T10223 Sliding Table on my SawStop cabinet saw and my first impression on how it works.
I ordered the sliding table via the internet on a Saturday, got confirmation that they received my order within a few hours. Monday they send me the order number, confirmed the cost of the unit $525.00, a discount of $25.00 to equal the UPS brokerage fee (I live in Toronto, Canada) plus $75.00 shipping.
(They have a promotion on to give Canadian customers that discount)
I had to sign a power of attorney form for UPS to give them the authority to clear the shipment through customs on my behalf.
For those interested there was no duty charged, only the 13% HST.(Harmonized Sales Tax)
On the Wednesday I received an e-mail telling me that the order had been shipped and they gave me a UPS tracking number. Following up with UPS tracking I found out that expected delivery would be Friday.
On Friday midday I received a call that delivery would be the following Monday. When I questioned why not today, they told me that with a delivery to a residential address they call first to make sure that someone would be home to accept delivery. Fair enough!
I asked if I could pick it up instead at their terminal and that was no problem, so I did.
And here is what the shipment looked like:
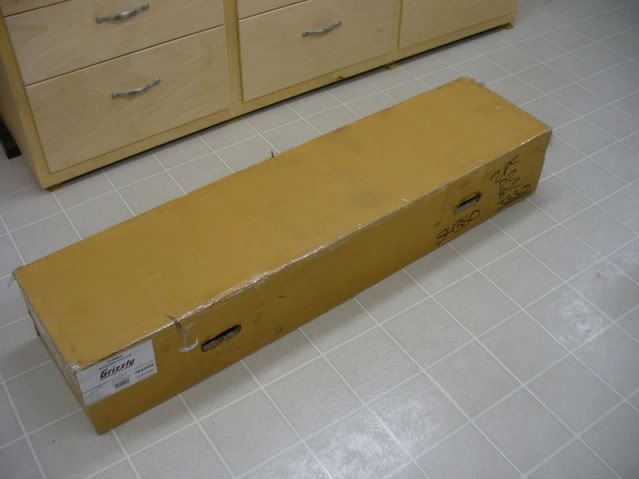
I slit the box open, very heavy triple layer corrugated cardboard, everything nicely fitted in and looking undamaged.
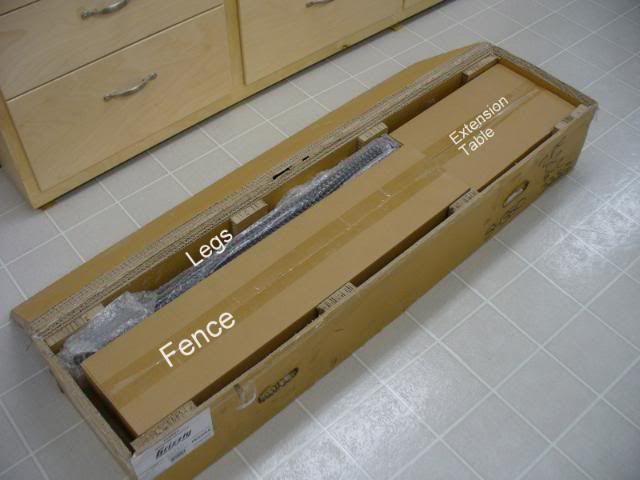
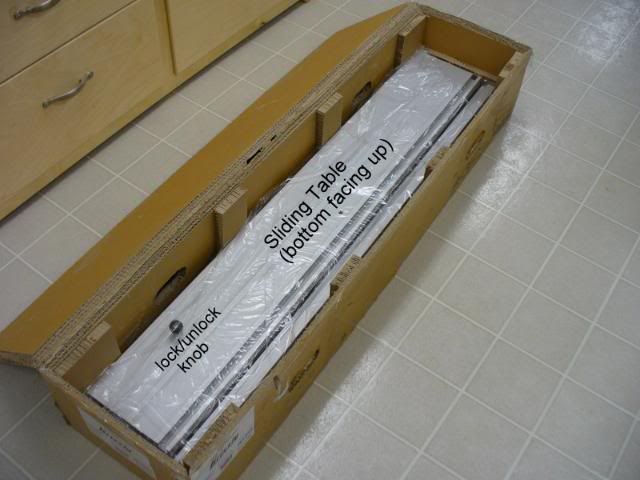
The legs, fence and extension table lifted out, showing the sliding table securely located in the box.
Everything unpacked. The only damage was some crushing damage on the right back top corner of the extension table. It must have happened before it was put in its box because there was absolutely no damage to the box, not a mark on it. I filed that smooth later.

This next picture shows that I removed the left cast iron wing. I also moved the fence tube to the right.
The fence was bolted to the front rail from below with six bolts. Moving the tube by one mounting hole, would not have been enough and since I didn't want to cut the fence tube, I drilled and tapped a new set of holes in the bottom of the tube and used those to re-mount the fence tube. The green masking tape was there to protect the tube when I had it upside down on
the drillpress table.
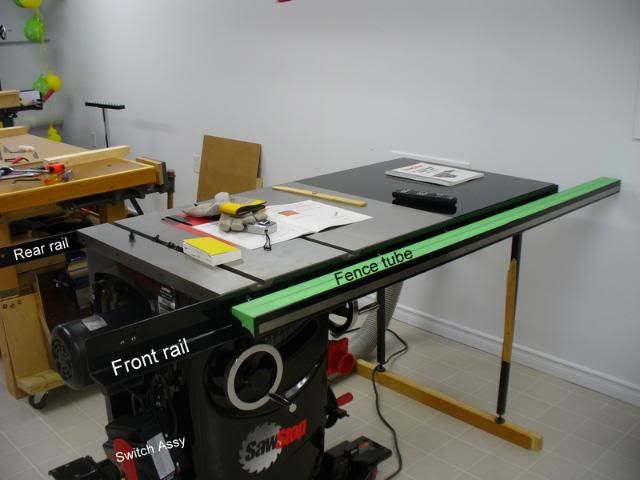
The rails have been cut. That was painful by the way. I was originally going to use the rails to support the sliding table so I would not have to use the legs but I changed my mind in order to speed things up. When I have some more time I might still do that. At any rate the rear rail had to be cut off completely because it wasn't deep enough. The front rail was and you can see how I cut it. What was left of the rail was used to support the re-located saw switch. On any saw one has to make sure that the wiring between the switch and the saw cabinet is long enough no matter the height or bevel angle of the blade.
I installed the legs and and rigged some support for the sliding table. The Grizzly installation manual
tells you to have the sliding table protrude about 0.01 to 0.02 inch above the surface of the saw-table.
I believe I used 2 sets of 4 sheets of paper between the saw table and the upside down cast iron wing I had removed earlier. I shimmed the sliding table up until it touched the cast iron wing tightened the 3 bolts holding the sliding table to the saw table. You'll note that the Sawstop uses 4 bolts to attach the wings, the sliding table uses 3 bolts. This meant that I had to drill and tap 3 new holes in the saw table.
It would have been nice if Grizzly supplied a template to locate these holes on any saw other then a Grizzly.
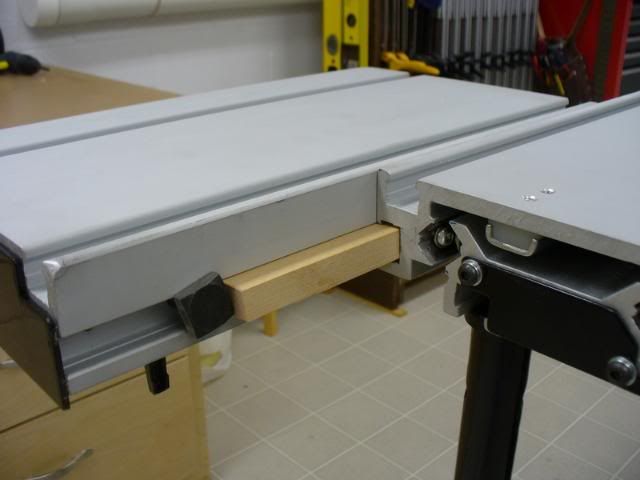
This next picture shows a close-up. The gap created by the sheets of paper appears larger then it actually is because the edge of the cast iron wing is beveled.
This shows the sliding table installed.

I cut a slat from some maple I had. With that in place the extension table slides a lot easier along the slider whenever you want to move it to another position..
Installing the extension table.
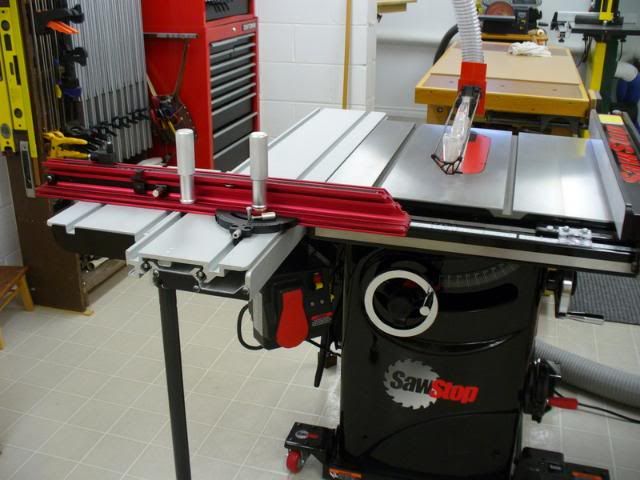
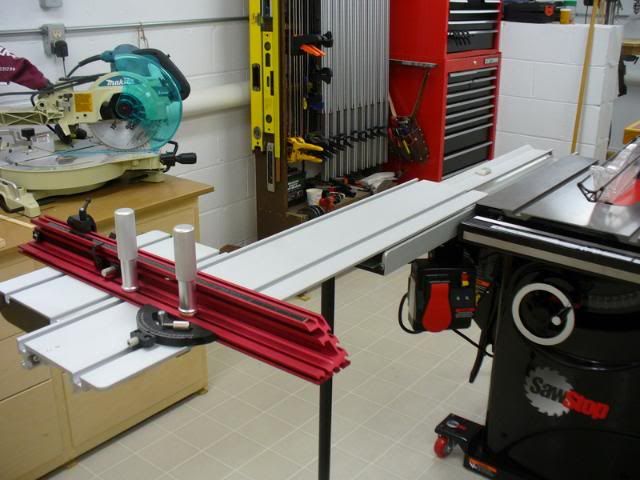
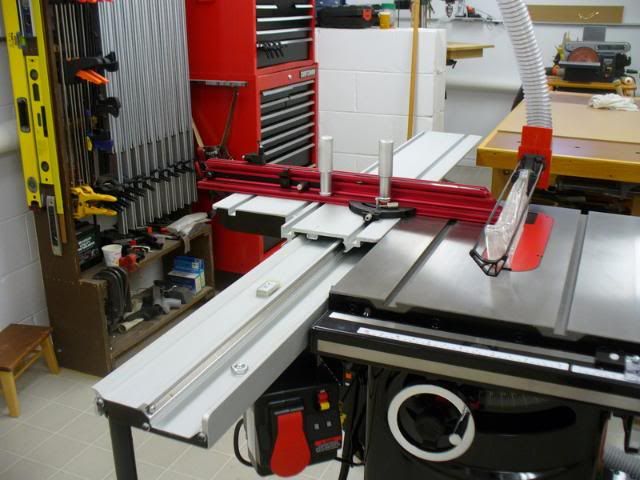
This picture shows the installation completed with the following 2 pictures showing the full range of slider travel.
Comments on the installation:
There was no need to do any shimming to make sure that the slider runs parallel to the blade. In my installation it was right on.
As I mentioned earlier, a template to locate the mounting holes on a saw other then a Grizzly would be easy to do for Grizzly. In fact if they supplied that on their website, you could then check to make sure that nothing on your saw would interfere with the required location of the tapped holes needed to mount the sliding table, before you ordered it.
There are some errors in the installation manual. For instance, one is instructed to use a 4mm hex wrench but the screw head actually requires a Phillips screwdriver. The manual tells you to be aware that the large aluminum pivot handles have different threads, in fact on mine the threads were identical.
There is also some inconsistency in some cases between the name used for a part in a picture versus what it is called in the exploded view parts list. Or the arrow points to the wrong component in the picture. I have an idea that certain changes were made to the unit over time without completely updating the manual. All minor points. All in all the installation took about 15-16 hours including taking pictures and fiddling around.
First impressions:
Slider travel is completely effortless and very smooth. So you get good feedback pushing the wood through the blade.
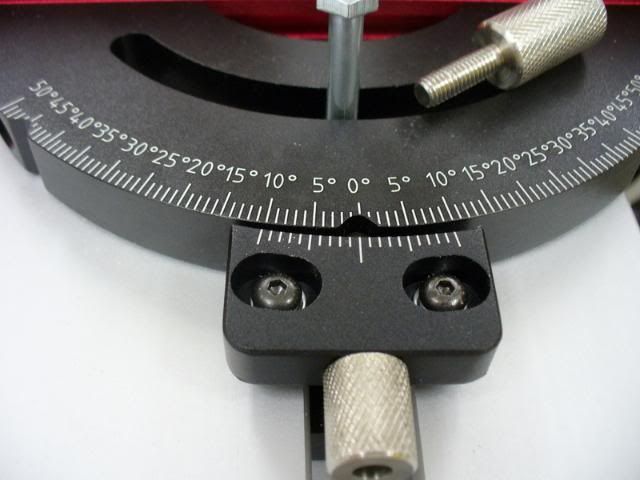
There is a problem though with the miter gauge: The spring-loaded pin locking it to an indent in the miter gauge is rather sloppy in its hole and as you can see in the next picture, the 0 degree indent is not centered on the 0 degree mark. For now I'll double check for a square cut using my carpenter's square.
You'll also see a knurled head bolt which is to be used where I now have a hex head bolt. The threaded section on the knurled head bolt is not long enough. In fact it's identical to another one used to lock the telescoping fence section in place. I think they simply picked the wrong one when packaging. For now I'll double check for a square cut using my carpenter's square.
By the way the two large pivoting handles are very effective, there's no way the fence is going to budge once they are snugged down.
I'll be in touch with Grizzly about these issues, I'm sure they will sort it out to my satisfaction.
It's just unfortunate that quality control didn't catch the problem with the miter gauge. I'll keep you posted.
Tim
I ordered the sliding table via the internet on a Saturday, got confirmation that they received my order within a few hours. Monday they send me the order number, confirmed the cost of the unit $525.00, a discount of $25.00 to equal the UPS brokerage fee (I live in Toronto, Canada) plus $75.00 shipping.
(They have a promotion on to give Canadian customers that discount)
I had to sign a power of attorney form for UPS to give them the authority to clear the shipment through customs on my behalf.
For those interested there was no duty charged, only the 13% HST.(Harmonized Sales Tax)
On the Wednesday I received an e-mail telling me that the order had been shipped and they gave me a UPS tracking number. Following up with UPS tracking I found out that expected delivery would be Friday.
On Friday midday I received a call that delivery would be the following Monday. When I questioned why not today, they told me that with a delivery to a residential address they call first to make sure that someone would be home to accept delivery. Fair enough!
I asked if I could pick it up instead at their terminal and that was no problem, so I did.
And here is what the shipment looked like:
I slit the box open, very heavy triple layer corrugated cardboard, everything nicely fitted in and looking undamaged.
The legs, fence and extension table lifted out, showing the sliding table securely located in the box.
Everything unpacked. The only damage was some crushing damage on the right back top corner of the extension table. It must have happened before it was put in its box because there was absolutely no damage to the box, not a mark on it. I filed that smooth later.
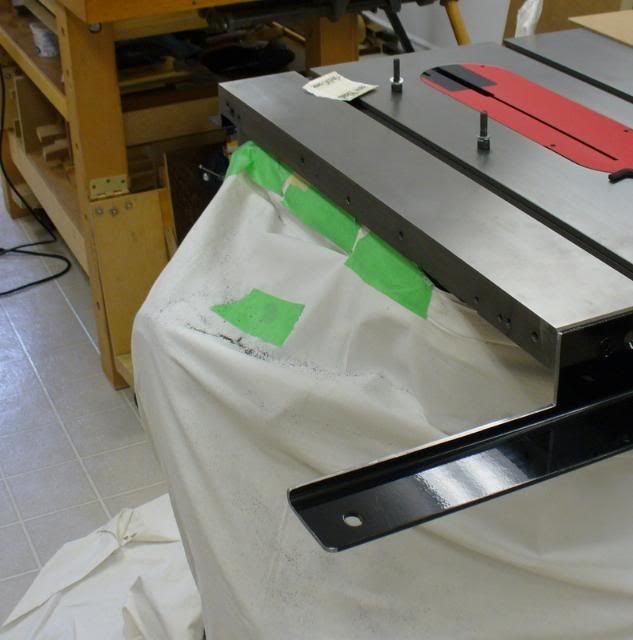
This next picture shows that I removed the left cast iron wing. I also moved the fence tube to the right.
The fence was bolted to the front rail from below with six bolts. Moving the tube by one mounting hole, would not have been enough and since I didn't want to cut the fence tube, I drilled and tapped a new set of holes in the bottom of the tube and used those to re-mount the fence tube. The green masking tape was there to protect the tube when I had it upside down on
the drillpress table.
The rails have been cut. That was painful by the way. I was originally going to use the rails to support the sliding table so I would not have to use the legs but I changed my mind in order to speed things up. When I have some more time I might still do that. At any rate the rear rail had to be cut off completely because it wasn't deep enough. The front rail was and you can see how I cut it. What was left of the rail was used to support the re-located saw switch. On any saw one has to make sure that the wiring between the switch and the saw cabinet is long enough no matter the height or bevel angle of the blade.
I installed the legs and and rigged some support for the sliding table. The Grizzly installation manual
tells you to have the sliding table protrude about 0.01 to 0.02 inch above the surface of the saw-table.
I believe I used 2 sets of 4 sheets of paper between the saw table and the upside down cast iron wing I had removed earlier. I shimmed the sliding table up until it touched the cast iron wing tightened the 3 bolts holding the sliding table to the saw table. You'll note that the Sawstop uses 4 bolts to attach the wings, the sliding table uses 3 bolts. This meant that I had to drill and tap 3 new holes in the saw table.
It would have been nice if Grizzly supplied a template to locate these holes on any saw other then a Grizzly.
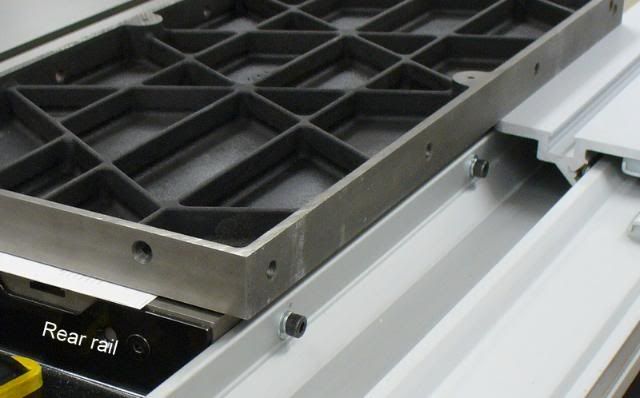
This next picture shows a close-up. The gap created by the sheets of paper appears larger then it actually is because the edge of the cast iron wing is beveled.
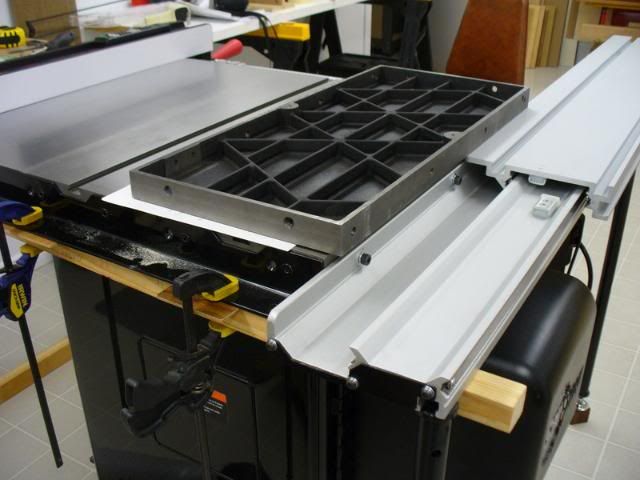
This shows the sliding table installed.
I cut a slat from some maple I had. With that in place the extension table slides a lot easier along the slider whenever you want to move it to another position..
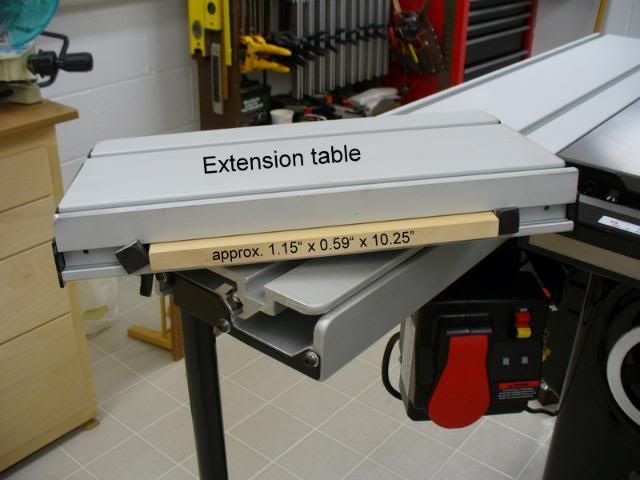
Installing the extension table.
This picture shows the installation completed with the following 2 pictures showing the full range of slider travel.
Comments on the installation:
There was no need to do any shimming to make sure that the slider runs parallel to the blade. In my installation it was right on.
As I mentioned earlier, a template to locate the mounting holes on a saw other then a Grizzly would be easy to do for Grizzly. In fact if they supplied that on their website, you could then check to make sure that nothing on your saw would interfere with the required location of the tapped holes needed to mount the sliding table, before you ordered it.
There are some errors in the installation manual. For instance, one is instructed to use a 4mm hex wrench but the screw head actually requires a Phillips screwdriver. The manual tells you to be aware that the large aluminum pivot handles have different threads, in fact on mine the threads were identical.
There is also some inconsistency in some cases between the name used for a part in a picture versus what it is called in the exploded view parts list. Or the arrow points to the wrong component in the picture. I have an idea that certain changes were made to the unit over time without completely updating the manual. All minor points. All in all the installation took about 15-16 hours including taking pictures and fiddling around.
First impressions:
Slider travel is completely effortless and very smooth. So you get good feedback pushing the wood through the blade.
There is a problem though with the miter gauge: The spring-loaded pin locking it to an indent in the miter gauge is rather sloppy in its hole and as you can see in the next picture, the 0 degree indent is not centered on the 0 degree mark. For now I'll double check for a square cut using my carpenter's square.
You'll also see a knurled head bolt which is to be used where I now have a hex head bolt. The threaded section on the knurled head bolt is not long enough. In fact it's identical to another one used to lock the telescoping fence section in place. I think they simply picked the wrong one when packaging. For now I'll double check for a square cut using my carpenter's square.
By the way the two large pivoting handles are very effective, there's no way the fence is going to budge once they are snugged down.
I'll be in touch with Grizzly about these issues, I'm sure they will sort it out to my satisfaction.
It's just unfortunate that quality control didn't catch the problem with the miter gauge. I'll keep you posted.
Tim